-
[WPF] Reduce WPF App Startup TimeC#/WPF 2024. 1. 16. 16:04
# .net7 부터 AOT 지원 ( WPF에서는 사용 안됨. Reflection 등의 이유로).
Limitations of Native AOT deployment- No dynamic loading (for example, Assembly.LoadFile)
- No runtime code generation (for example, System.Reflection.Emit)
- No C++/CLI
- No built-in COM (only applies to Windows)
- Requires trimming, which has limitations
- Implies compilation into a single file, which has known incompatibilities
- Apps include required runtime libraries (just like self-contained apps, increasing their size, as compared to framework-dependent apps)
# Crossgen2 사용.
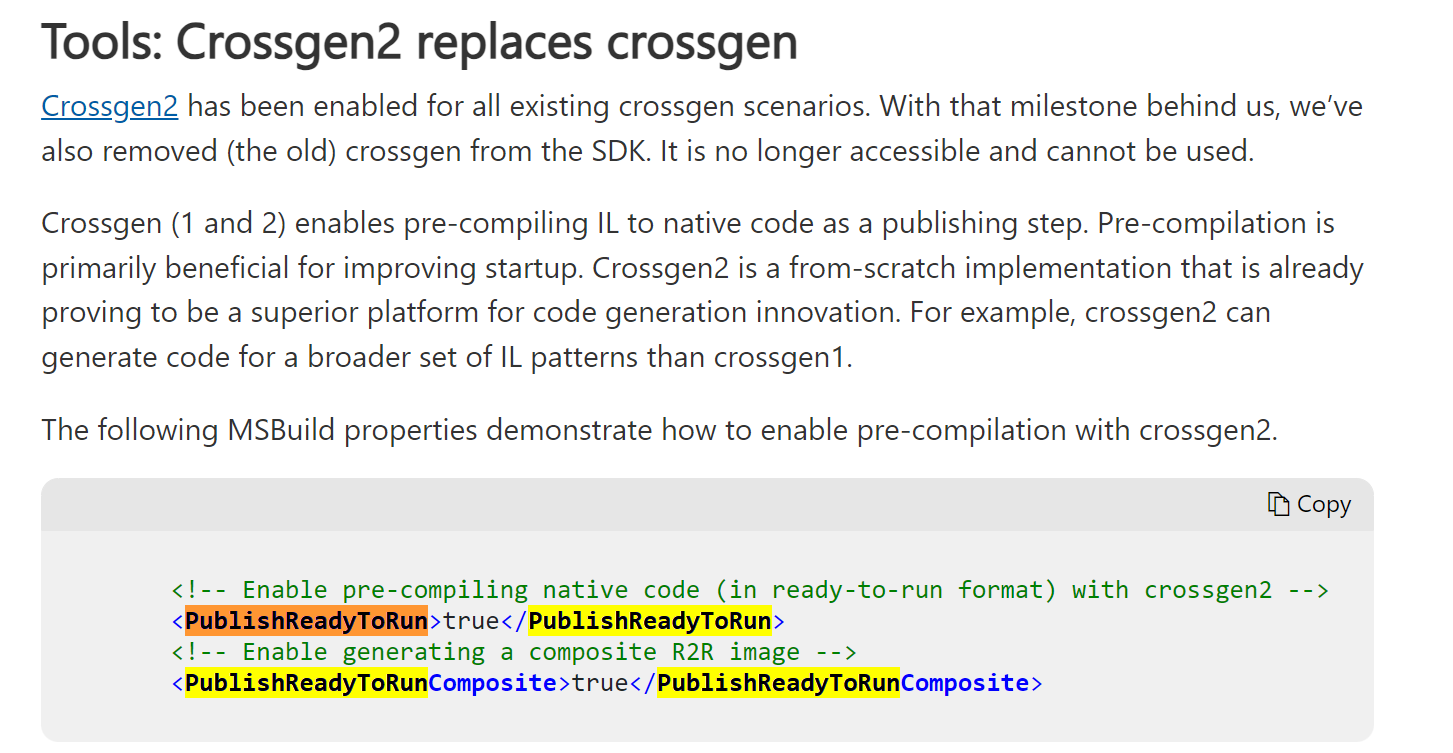
https://learn.microsoft.com/ko-kr/dotnet/core/deploying/ready-to-run
ReadyToRun 배포 개요 - .NET
ReadyToRun 배포의 정의와 .NET 5 및 .NET Core 3.0 이상 버전을 사용하여 앱을 게시하는 과정에서 사용을 고려해야 하는 이유를 알아봅니다.
learn.microsoft.com
https://devblogs.microsoft.com/dotnet/announcing-net-6-preview-6/
Announcing .NET 6 Preview 6 - .NET Blog
.NET 6 Preview 6 is now available.
devblogs.microsoft.com
Conversation about crossgen2 - .NET Blog (microsoft.com)
Conversation about crossgen2 - .NET Blog
Conversation with .NET engineers about crossgen2.
devblogs.microsoft.com
9 Tips to Reduce WPF App Startup Time
1. Ngen.exe
Native Image Generator (Ngen.exe) is the first tool you should consider when optimizing startup for a .NET Framework app (.NET/.NET Core projects don’t support Ngen). As you may know, .NET Framework projects produce assemblies with Microsoft Intermediate Language (MSIL) code. This code needs to be translated to machine code before executing the application. Translation from MSIL to machine code begins at startup - a process that may require significant time.
You can use Ngen.exe to generate native image libraries that already contain native code. It’s important to note that Ngen.exe should be used on the machine where your application will be used. You can run it on your machine to test performance, but to optimize cold start for an end user, you need to use Ngen.exe on the user machine.
The best way to run Ngen on a user’s machine is to incorporate Ngen.exe within your application installer. You’ll need to execute the following line during the installation process and Ngen.exe will automatically process all assemblies associated with your project:
C:\Windows\Microsoft.NET\Framework\v4.0.30319\ngen.exe install C:\MyApp.exeIf you distribute your application as Click Once or an archive (and don’t have an installer), you can call Ngen.exe from code during application startup. To only run Ngen.exe for the first startup, calculate a hash for your executable file and check this hash during subsequent startups:
var savedHash = string.Empty;
var assemblyLocation = Assembly.GetEntryAssembly().Location;

// Specify a path to the file that stores your executable’s hash.
// Create this file or load the saved hash if the file already exists:
var hashPath = Path.Combine(Environment.GetFolderPath(Environment.SpecialFolder.ApplicationData), "hash.txt");
if (!File.Exists(hashPath)) {
    File.Create(hashPath);
} else {
    savedHash = File.ReadAllText(hashPath);
}

// Obtain the hash for your executable.
// Cancel the operation if the application does not have changes:
var hash = string.Concat(SHA1.Create().ComputeHash(File.ReadAllBytes(assemblyLocation))
    .Select(x => x.ToString("x2")));
if (hash.Equals(savedHash))
    return;

// Obtain the path to ngen.exe:
var dotNetRuntimePath = RuntimeEnvironment.GetRuntimeDirectory();
var ngenPath = Path.Combine(dotNetRuntimePath, "ngen.exe");

// Create a process that runs ngen.exe:
var process = new Process {
    StartInfo = new ProcessStartInfo {
        FileName = ngenPath,

        // Pass the path to your executable:
        Arguments = $"install \"{assemblyLocation}\" /nologo",
        CreateNoWindow = true,
        WindowStyle = ProcessWindowStyle.Hidden,

        // Run the process as administrator:
        UseShellExecute = true,
        Verb = "runas"
    }
};

// Run the process and save the executable’s hash:
try {
    process.Start();
    process.WaitForExit();
    File.WriteAllText(hashPath, hash);
}
catch {
    // Failed to start.
    // For example, a user cancelled the UAC prompt.
}
Windows 8 (and newer versions of the Windows OS) include a Native Image Task that automatically generates native images for frequently used .NET Framework 4.5+ applications when a computer is idle. Nonethless, you still need to run Ngen.exe manually, because Native Image Task only works with assemblies located in GAC or Windows Store app package.
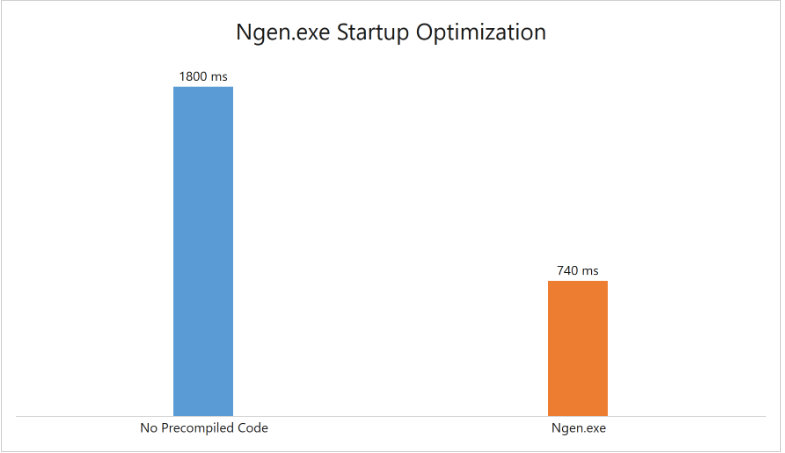
The image below illustrates startup benefits you can expect from Ngen.exe:
2. MultiCore JIT
Alternatively, you can optimize the translation of Microsoft Intermediate Language (MSIL) to machine code by translating most frequently used methods asynchronously at application startup. You can use MultiCore JIT for this purpose (available for .NET and .NET Framework 4.5+ apps). MultiCore JIT logs methods used by your application and saves them to disk. When the application is executed for the second time, saved methods are compiled to native code in a separate process.
You simply need to use the following two lines of code in your app constructor to enable MultiCore JIT:
public App() {
    // Defines where to store JIT profiles
    ProfileOptimization.SetProfileRoot(@"C:\MyAppFolder");
    // Enables Multicore JIT with the specified profile
    ProfileOptimization.StartProfile("Startup.Profile");
}
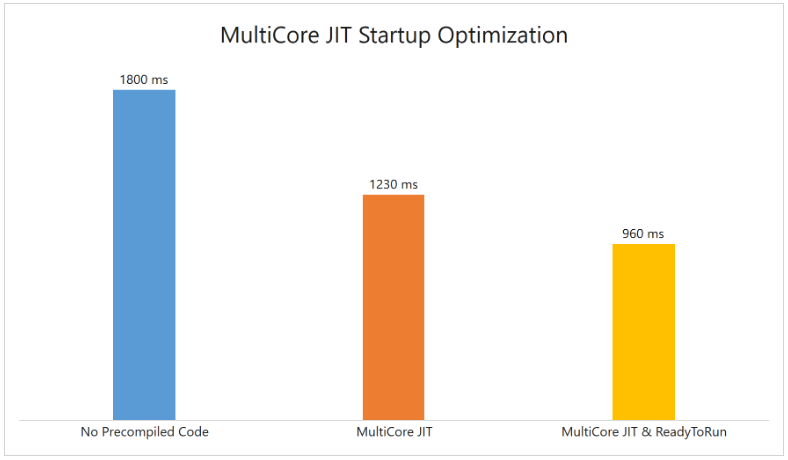
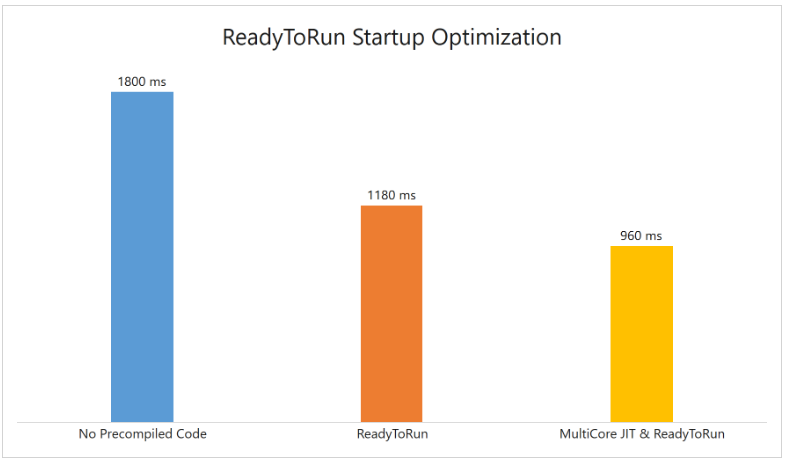
MultiCore JIT is not as effective as Ngen.exe in terms of startup optimization. The good news is that it supports both .NET Framework and .NET/.NET Core projects. You can combine MultiCore JIT with the ReadyToRun option (described later) and benefit from both optimization strategies.
3. ReadyToRun
ReadyToRun (R2R) is a form of ahead-of-time (AOT) compilation. Applications published with R2R contain both MSIL and native code sections, which eliminates the need of just-in-time compilation (to a certain extent).
The R2R option is available only in .NET/.NET Core projects. To enable R2R, modify your “.csproj” / “.vbproj” file and add the PublishReadyToRun tag:
<PropertyGroup>
  <PublishReadyToRun>true</PublishReadyToRun>
</PropertyGroup>
To proceed with this strategy, publish your project:
- Right-click the project and select Publish:
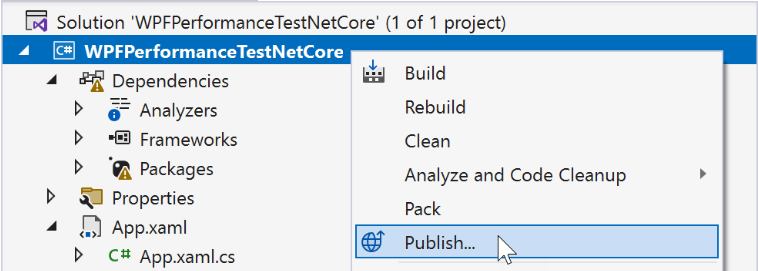
- In the subsequent dialog, select the target folder where the published application will reside.
- Open publish settings, select the target runtime and click the Publish button:
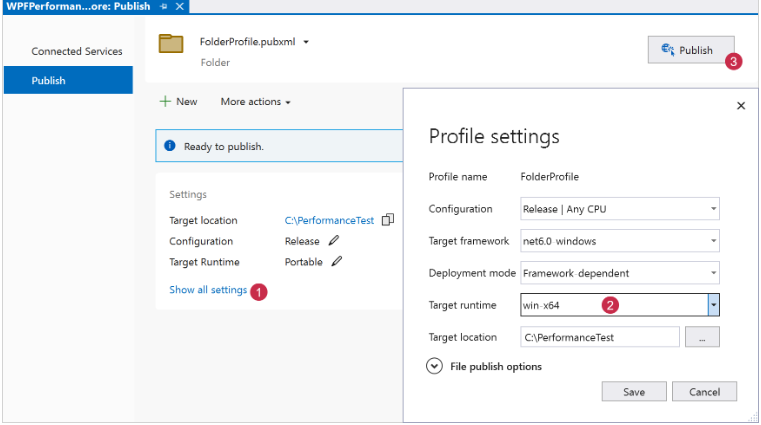
- Open the target folder and run your “.exe” file.
As mentioned earlier, R2R can be used together with MultiCore JIT in .NET/.NET Core applications. The image below illustrates startup benefits you can expect from R2R and MultiCore JIT.
4. RibbonPage Deferred LoadingIf your application contains a DevExpress Ribbon Control with multiple items, on-demand page loading may help you reduce startup time.
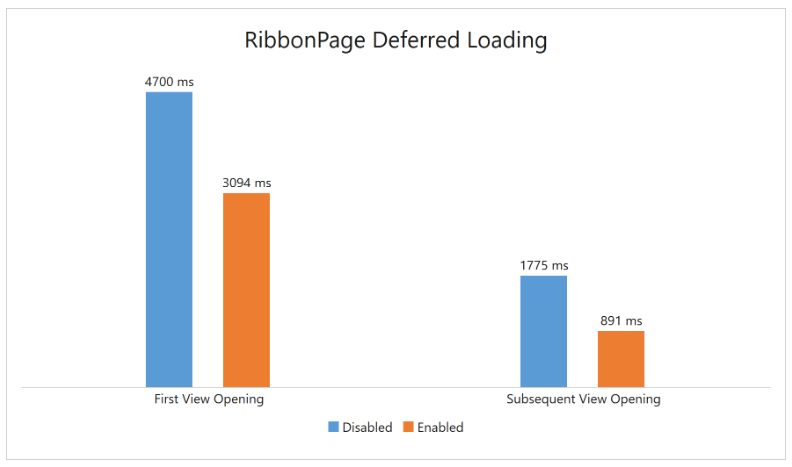
To enable deferred RibbonPage item loading, move a RibbonPage’s RibbonPageGroups to the GroupCollectionTemplate.
<dxr:RibbonControl RibbonStyle="Office2019">
    <dxr:RibbonDefaultPageCategory>
        <dxr:RibbonPage Caption="File">
            <!-- ... -->
        </dxr:RibbonPage>
        <dxr:RibbonPage Caption="Home">
            <dxr:RibbonPage.GroupCollectionTemplate>
                <DataTemplate>
                    <ItemsControl>
                        <dxr:RibbonPageGroup Caption="File">
                            <dxb:BarButtonItem ... />
                            <dxb:BarButtonItem ... />
                        </dxr:RibbonPageGroup>
                    </ItemsControl>
                </DataTemplate>
            </dxr:RibbonPage.GroupCollectionTemplate>
        </dxr:RibbonPage>
    </dxr:RibbonDefaultPageCategory>
</dxr:RibbonControl>
Please refer to the following help topic for additional information: Deferred RibbonPage Content Loading.
5. Use LoadingDecorator for “Heavy” UI Elements
Since WPF works with the UI in the main thread, the entire window remains frozen until all elements are loaded. The DevExpress LoadingDecorator allows you to load separate UI sections asynchronously:

By implementing this strategy, your app can display “lighter” UI elements before loading “heavier” elements on screen. In the animation above, I wrapped the right section of the view within LoadingDecorator to display our lightweight navigation menu first. The right section is displayed only when it’s fully loaded:
<Grid>
    <Grid.ColumnDefinitions>
        <ColumnDefinition Width="Auto"/>
        <ColumnDefinition Width="*"/>
    </Grid.ColumnDefinitions>
    <dxa:AccordionControl>
        <!--...-->
    </dxa:AccordionControl>
    <dx:LoadingDecorator Grid.Column="1">
        <dxdo:DockLayoutManager>
            <!--...-->
        </dxdo:DockLayoutManager>
    </dx:LoadingDecorator>
</Grid>
6. Cache Tabs on Selection
If your application uses a tabbed interface, you can fine-tune performance using different tab cache modes. This feature is available within our WPF Tab Control (DXTabControl) and our WPF DockLayoutManager (when tabbed DocumentGroups or LayoutGroups are used).
Tabs are not cached by default, which is fine for initial startup. However, if you decide to open the same tab a second time, its content will be loaded once again. To use previously loaded elements, cache tabs after selection. This behavior is controlled by the TabContentCacheMode property (for DXTabControl, LayoutGroup and DocumentGroup). Set TabContentCacheMode to CacheTabsOnSelecting to enable this strategy.
If tab switching is more important than startup performance, you can set TabContentCacheMode to CacheAllTabs. In this instance, all tabs will be loaded and cached together with the first tab. This may significantly increase view loading time, however other tabs will be switched faster, even if you open them for the first time.
7. Load Data on Demand
While your application may work with large amounts of data, your users may not need to view all data in one shot. Many of our WPF controls allow you to load data on demand. The following WPF DevExpress WPF components support virtualization/on-demand data loading:
- GridControl
Server Mode/Instant Feedback
Virtual Sources - ComboBoxEdit, LookUpEdit, ListBoxEdit
Server Mode/Instant Feedback - TreeListControl
Fetch Nodes Asynchronously - PivotGridControl
Database Server Mode - SchedulerControl
Load Data on Demand
8. Preload Theme Resources
DevExpress components contain many XAML resources used by themes. WPF parses all these resources when a component is displayed for the first time. You may have noticed that displaying the same control for the second time takes much less time even if this control was displayed previously in a different view.
DevExpress themes allow you to partially load theme resources before a component is displayed on-screen. Although this won’t speed up the main view, all child views will open faster. You can use the following code to implement this strategy:
using DevExpress.Xpf.Core;

public partial class App : Application {
    protected async override void OnStartup(StartupEventArgs e) {
        base.OnStartup(e);
        await ThemeManager.PreloadThemeResourceAsync("Office2019Colorful");
    }
}
If your application uses a Splash Screen, you can preload theme resources within it. Please refer to the following example for more information on this startup strategy: Synchronous Theme Preload With Splashscreen.
9. Use a Performance Profiler to Detect Issues
Certain operations in View/ViewModel initialization may generate unwanted startup delays. These delays may occur if you synchronously communicate with a remote service, process large files, or execute other resource-intensive operations in a View/ViewModel constructor.
Visual Studio includes a built-in Performance Profiler to help determine the exact cause of performance-related issues. To discover time-consuming operations, follow the steps below:
- Go to Debug -> Performance Profiler in Visual Studio.
- Select the CPU Usage checkbox and click Start.
- When the application loads, click Stop Collection to view CPU usage data in the profiling tab. The profiler will automatically highlight problematic methods.
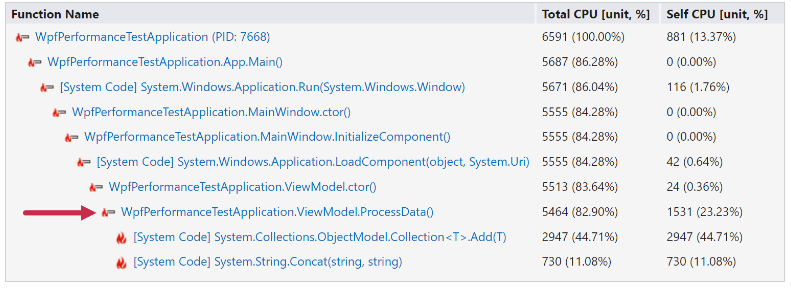
You can click individual methods to navigate to a detailed call tree.
As you can see from the image above (taken from a test application), significant resources were consumed by the ProcessData method (called by the ViewModel constructor). One way to address this issue is to process the operation asynchronously.
9 Tips to Reduce WPF App Startup Time
This post will document 9 strategies to improve cold start performance for your WPF app. The 3 techniques listed below apply to all WPF apps, regardless of components used: Ngen.exe MultiCore JIT ReadyToRun The following techniques are specific to DevExpre
community.devexpress.com
https://www.sysnet.pe.kr/2/0/13162
.NET Framework: 2069. .NET 7 - AOT(ahead-of-time) 컴파일
.NET Framework: 2069. .NET 7 - AOT(ahead-of-time) 컴파일 [링크 복사], [링크+제목 복사] 조회: 5000 글쓴 사람 정성태 (techsharer at outlook.com) 홈페이지 첨부 파일 부모글 보이기/감추기 (연관된 글이 4개 있습니
www.sysnet.pe.kr
Performance Enhancements | WPF Controls | DevExpress Documentation
This topic lists techniques that can enhance your WPF application’s performance. Common WPF Performance Enhancements You can improve your application’s startup performance if you pre-compile Microsoft Intermediate Language (MSIL) code. This recommendat
docs.devexpress.com
728x90'C# > WPF' 카테고리의 다른 글
[WPF] IOC, IServiceProvider (0) 2024.01.26 [WPF] 어셈블리에서 로드한 정보로 인스턴스 생성. (0) 2024.01.26 [WPF] App.config (0) 2024.01.09 [WPF] kakaotalk 예제 (0) 2024.01.03 [WPF] ListBox SelectItem Don't Focus (0) 2023.12.07 댓글